Configure a Gateway Version
Contents
Overview
Note: This document is intended for use by sites implemented with ERP and/or SCM prior to January, 2017. After that date, the Pulse appliance is installed for new sites, instead of the "traditional" gateway portal described in this topic.
Please inquire with the Premier Solution Center before you attempt to either set up a Gateway or edit the configuration of an existing Gateway.
A system Gateway and the Pulse appliance each automatically downloads and uploads files between
the system and your local network. The gateway/Pulse monitors the system
for files that need to be transferred to your network and automatically
transfers them. Similarly, the gateway/Pulse monitors your network's folders for files
to upload to the system and performs the upload. A gateway or Pulse can export patient
charges to your billing application, item records to storage units such as Pyxis,
and more.
Technical Support (at the Solution Center) must install the gateway feature for you. Setting up and configuring gateways are tasks a system administrator performs (but the Help Desk can assist). To use a gateway, you create the gateway, assign one or more organizations
to it, and identify any specific types of files that you want the gateway to
handle (such as "Patient Charge files" and "Scanned Imports"). Gateways upload files
to the system from an "inbox" folder on your local file system. A gateway
can monitor as many inboxes as you wish. A gateway downloads the system
files to folders on your local file system. You can download files to any location
on your network. You can also configure an FTP server to send downloaded files
to other networks at your site.
In creating gateways, several scenarios
are possible. You can set organization-specific options for a gateway. These
settings are useful if you have multiple organizations with different needs
using a single gateway. You can also create multiple gateways and configure
each to handle different organizations, file types, or both.
You can disable uploading and downloading at the gateway, organization, or
file level. You can also disable the FTP server at the same levels. With a disabled
server, files are still downloaded to your local file system -- they just are
not sent to a final destination via FTP.
The system communicates any upload
or download failures to you using messages. If an upload of a file to the system
is not successful, a message is written, and the file is sent to a designated
"holding" directory. If a download is not successful, you also get
a message. You can correct problems with the download file and flag the file
for another download attempt by the gateway.
This topic explains the basic setup of a gateway and more advanced configuration
possibilities for organizations and file types. Again, this information is for reference only. The Solution Center will handle any changes or new installs that you need.
For existing sites with Gateways, as a reference, here are the current requirements:
System and hardware requirements for gateways are in the following table.
Table 1 - Gateway Requirements for Non-Pulse Sites
| Operating System |
Windows 2008 R2 Server (preferred) or Windows Server 2012 (32 or 64 bit)
Note: if planning to use the scanning process, this must be Windows 2008 or higher. |
Web Browser |
Microsoft Edge or Google Chrome. This requirement is the same as the application's general requirement. |
Other Software |
Internet Information Services (IIS) 5.0 or higher. The IIS subcomponent “File Transfer Protocol (FTP) Server” should be installed. Also, Microsoft XML 4.0, Service Pack 2 (available as a download from Microsoft). |
Networking |
Access to Internet (443 for SSL) and to any shared network drives. |
Memory |
At least 2 gigabyte (GB) of RAM (recommended minimum), 4 GB preferred. |
Hard Disk |
30 GB C: Drive for operating system/Program files, etc.
100 GB D: Drive (data) free space for file downloads and uploads.
Or
100 GB C: Drive for operating system/program files and file downloads and uploads with minimum 70 GB free space. |
Special Notes |
- The Gateway Server does not need to be a dedicated server
- The Gateway Server can be a Virtual Machine (VM)
- A User ID should be provided that has Admin rights to install software, manage folders, etc. We suggest that this User ID have a password that does not expire, or a second user id be created for use on server jobs (prevents down time when they expire).
- The site will need access from Gateway Server to the appropriate FTP Site (previously: ftp.mediclick.com). A site's firewall rules must be configured to allow access.
|
Basic setup activities to configure a working gateway are:
- Identify the gateway
Includes specifying FTP settings for the gateway if you need to send files
to another network at your site.
- Assign organizations
to the gateway
- Enable file types that
the gateway should handle
Other activities include:
Examples of files that can be exported through a gateway are:
- Advance Replenishment Notices (EDI 856)
- AP transactions
- AP checks
- Item records
- Custom exports, such as formatted reports
- Invoices
- General ledger transactions
- Patient charges
- Excel spreadsheets
- Warehouse
- Print PDF
- Scanned imports
- Released requisition pick lists
- Purchase order receiving documents.
You can view the status of files downloaded through the gateway. On the Export panel for each type of file, the column Gateway Download Status shows
whether the file was successfully exported.
Security
Your user profile must include the appropriate permission to configure
gateways. To create and configure gateways, the system administrator must have the "Gateway"
role object set to Create or higher. See Set
Up and Maintain Users for more information about Role
Objects.
Again, check with the Premier Solutions Center before you attempt any existing gateway re-configuration.
Basic Gateway Setup
To create a new gateway:
- From Work in Administration, select Client Gateway > Gateways.
The list of your gateways appears (Figure 1). If you have no gateways set
up, No Data appears.

Figure 1 - Gateways List
- Click New.
The new Gateway tabbed panel appears (Figure 2). Enter information in this
panel to define your new gateway.
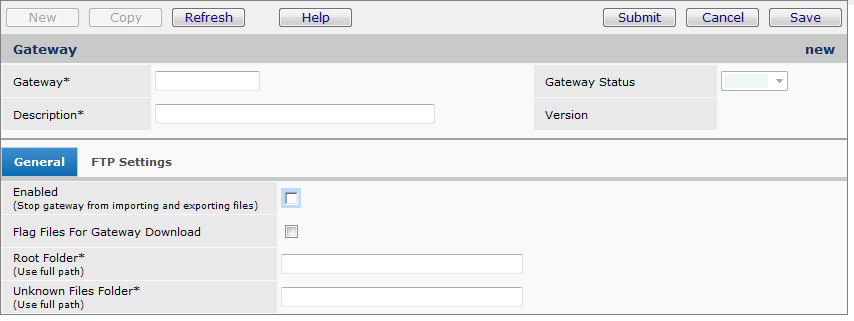
Figure 2 - Gateway Edit Panel
- Complete the required fields on the header and General tab.
- Enter a code for the gateway and a description in the fields Gateway
and Description.
- Gateway Status is an information-only field that indicates the status
of your local network location where the gateway resides. This location is
typically managed by your network administrator. The status can be one of
the following: Start, Pause, or Stop. (The field is empty
when you first define your gateway.)
- Enabled, when selected, "turns on" the gateway so that files are
uploaded and downloaded.
This field enables the gateway as a whole. You can also enable the gateway
at the organization level (for particular organizations) or at the file type
level (for particular file types). If your gateway sends files to another
network via an FTP server, you can disable and re-enable the FTP transfer
by itself, as well.
- Root Folder is the root directory for the gateway. For example,
if you are setting up a gateway called Adam, the root file might be:
c:\gateway\adam. This directory is the "top level" folder in the gateway
directory hierarchy. Other gateway folders—such as inboxes for uploads to
the system and folders for files downloaded from the system—are located under
this directory by default. (You can change the defaults.) Enter a full path
for the folder.
- Unknown Files Folder is a "holding area" for files that the gateway
cannot deliver. This field is required.
Normally, files are uploaded to an the system inbox. When files are not recognized
by inboxes, the gateway puts the files in the Unknown Files Folder.
Define this folder as a subdirectory under the Root Folder; for example,
c:\gateway\adam\Unknown. Enter a full path for the folder. You receive a
message from the gateway when an unknown file is processed.
If you plan to send files to a different final network location, complete
the fields on the FTP tab (Figure 3). Note that for a gateway on an FTP
server, the Root Folder (General tab) and the FTP Folder
(FTP tab) refer to the same directory.
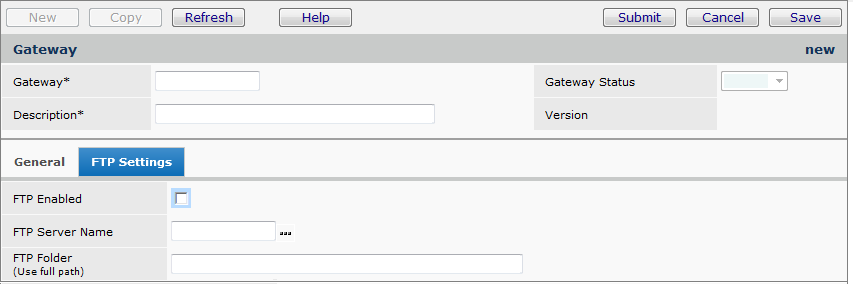
Figure 3 - Gateway FTP Settings for a New Gateway
- FTP Enabled: If you download files to another network using an FTP
server, check this box to "turn on" the gateway for the FTP server. If not
checked (disabled), files will still be downloaded to the client network,
but not sent to a final destination via FTP.
- FTP Server Name: Click the prompt to select a server.
- FTP Folder: The root folder for the gateway on the FTP server for
downloaded files. Enter the full path of the directory.
- Click Save periodically to save your work.
- When you are finished entering information in the fields, click Submit.
You are returned to the Gateway list.
- Click Refresh to view the server information on the list.
To assign organizations
to a gateway:
- From Work in Administration, select Client Gateway > Gateways.
The list of your gateways appears.
- Locate the gateway that you wish to configure.
- Next to the gateway name, select Menu > Assign Organizations (Figure
4).
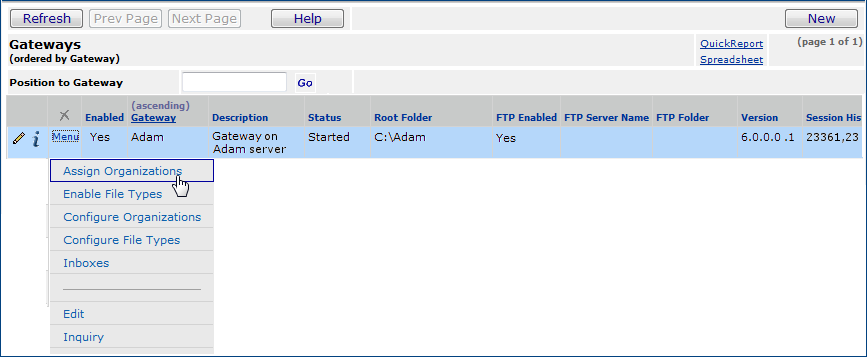
Figure 4 - Gateway Menu
A list of organizations at your site appears (Figure 5).
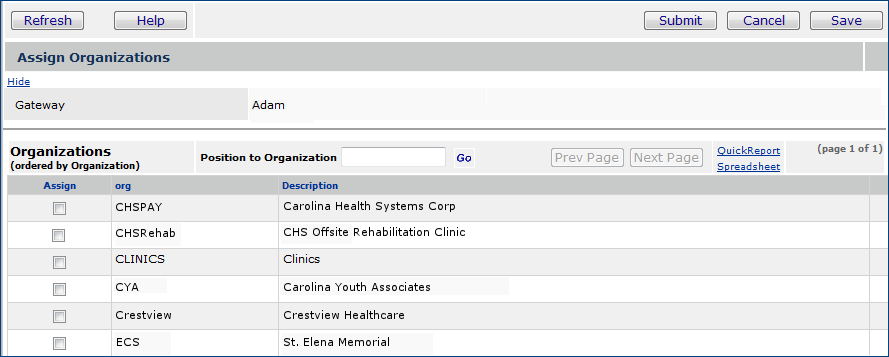
Figure 5 - Assign Organizations to a Gateway
- Select the box in the Assign column for each organization
that you wish to assign to the gateway. If the organization list has multiple
pages, click NextPage and Prev Page to scroll forward
and back.
Important:
An organization may be assigned to only one gateway.
- Click Submit when you are finished assigning organizations.
Files for the organization(s) that you identified will be uploaded and downloaded
by the gateway.
To enable file types for a gateway:
- From Work in Administration, select Client Gateway > Gateways.
The list of gateways appears.
- Locate the gateway that you wish to configure.
- Next to the gateway name, select Menu > Enable File Types (Figure
4).
A list of available file types that gateways can process for each organization
appears (Figure 6).
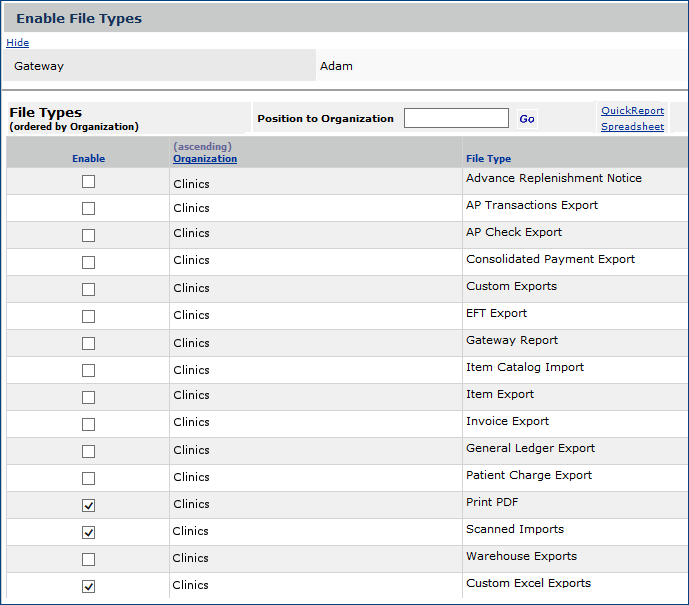
Figure 6 - Select File Types Panel for a Gateway
- Select the Enable box next to each file type that you want
the gateway to handle.
- Click Save.
- Click Submit. You are returned to the Gateway list.
Set
organization specific options for a gateway
Configuring an organization on a gateway is similar
to configuring an entire gateway. You may have several organizations assigned
to a single gateway. The organization panels allow you to enable or disable
the gateway for any particular organization without affecting the others. In
addition:
- You can specify a root folder for any organization
to use exclusively.
- You can define a command for your local system
to execute for any downloaded file.
- You can specify file types for each organization.
The gateway will process only those file types. (Other organizations and
their file types are not affected.)
To configure
a gateway for an organization:
- From Work in Administration, select Client Gateway > Gateways.
The list of your gateways appears.
- Locate the gateway on the list.
- Next to the gateway name, select Menu > Configure Organizations
(Figure 4). A list of organizations served by the gateway
appears.
- Locate the organization.
- Click the edit icon or Menu > Edit next to the organization name.
Note:
You can also select Configure File Types to
specify which of the available file types the gateway should upload and
download for the organization.
The Gateway Organization panel appears (Figure 7).
Figure 7 - Configure a Gateway for an Organization
- Enter information as needed on the Gateway Organization panel.
- Click Help for detailed information about the fields.
- When you are finished entering information, click Submit.
The system returns you to the Gateway Organizations list and makes the changes
you specified.
To
configure file types for an organization:
- From Work in Administration, select Client Gateway > Gateways.
The list of your gateways appears.
- Locate the gateway on the list.
- Next to the gateway name:
- Select Menu > Configure File Types (Figure
4).
A list of available file types that the gateway can handle appears (Figure 8).
OR
- Select Menu > Configure Organizations (Figure
4). A list of organizations served by the gateway appears.
- Locate the organization that you wish to configure.
- Next to the organization, select Menu > Configure File Types. A list of file types that the gateway handles appears (Figure 8).
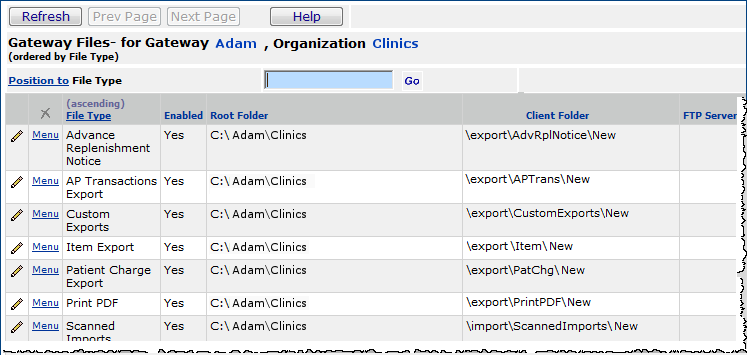
Figure 8 - Select Gateway File Types for an Organization
- Click the edit icon or select Menu > Edit next to the
row containing the file type that you wish to configure. The Gateway File
Configuration panel for the organization appears, similar to the Gateway Edit panel in Figure 2.
- Enter information as needed on the panel.
Note: For example, the field Printer App Path designates an application that renders documents in printable form; for example, Adobe Acrobat. This field is needed if your site is auto-printing receiving documents or pick lists.
- When you are finished entering information, click Submit.
The system returns you to the file types list and makes the changes that you
specified for the organization's file types.
Inboxes
Files for upload to the system are located in one or more inboxes. You
must set up your inboxes to use the gateway for importing files to the system.
To
set up a new inbox or change an existing inbox:
- From Work in Administration, select Client Gateway > Gateways.
The list of your gateways appears.
- Locate the gateway on the list.
- Next to the gateway name, select Menu > Inboxes (Figure
4).
If the gateway has no inboxes defined, No Data appears. Otherwise,
a list of inboxes for the gateway appears.
- You can edit an existing inbox by clicking the edit icon or selecting Menu
> Edit next to the inbox name.
- To create a new inbox, click New. The Gateway Inbox panel appears
(Figure 9)
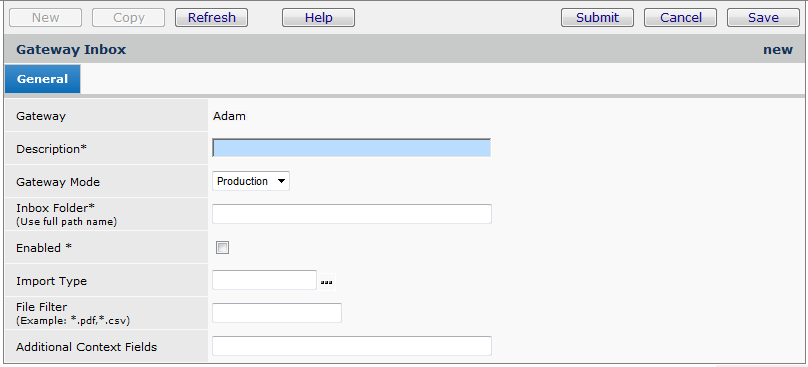
Figure 9 - Set Up Gateway Inbox
- Complete the fields on the Inbox panel to define a new Inbox.
- Select the Gateway Mode from the drop panel. The options are
Production and Test.
- In the Inbox Folder field, enter the location of the inbox. The
inbox folder contains files to be uploaded to the system.
- Click Submit. You are returned to the Gateway Inboxes list.
(Click Refresh to see any inboxes you have added.)
FTP Server
To configure an FTP
server:
- From Work in Administration, select Client Gateway > Gateway FTP.
If no FTP servers are defined, No Data appears. Otherwise, a list
of FTP servers appears.
- You can edit an existing server by clicking the edit icon or selecting
Menu > Edit next to the FTP Server Name.
- To configure a new FTP server, click New. The Gateway FTP edit panel
appears (Figure 10).
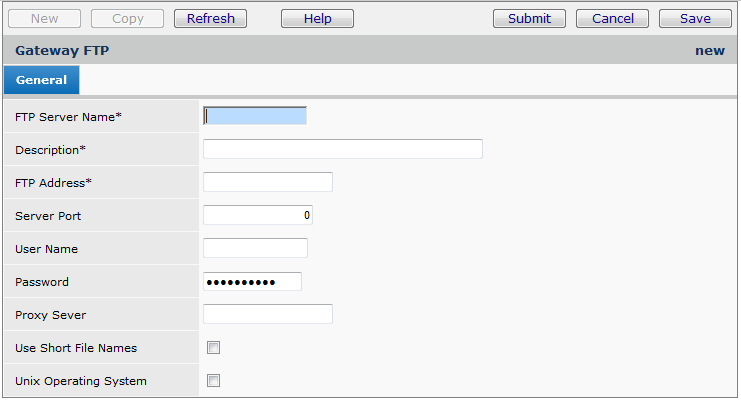
Figure 10 - Configure FTP Server
-
Enter information in the fields as needed.
- In
particular, notice the field Use Short File
Names.
Select this field if the server must transfer files to a system that limits
file names to eight characters. The gateway will generate short file names
for files that it transfers to the system. A part of the file name, such
as GL for General Ledger export files and IN for invoice files, designates
the file type.
- Click Help
for a discussion of this panel's other fields.
- Click Submit. You are returned to the FTP Servers list.
- Click Refresh to see the server added to the list.
Gateway Notifications
You can view messages sent by the gateway, such
as problems with uploads, format files, and others.
To view gateway notifications:
- From Work in Administration, select Client Gateway > Gateway Notifications.
The notifications list appears (Figure 11).
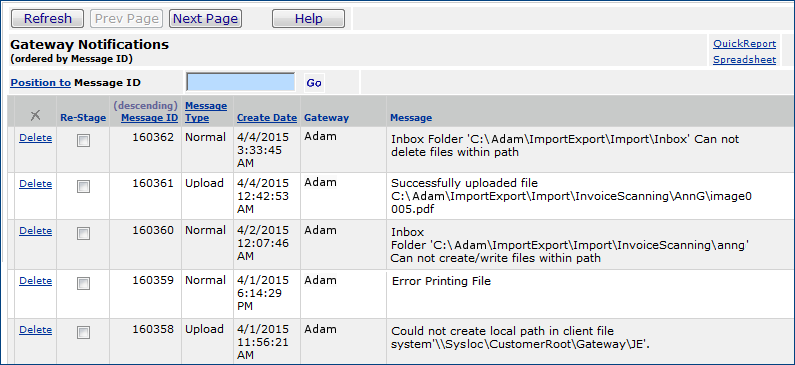
Figure 11 - Gateway Notifications
Sample messages in the figure include:
- Error uploading 'dec1804.csv'
Your upload file was Rejected because of the following reasons
CSV file's customer ID does not match your customer ID.
Import file not in correct format.
Explanation: The uploaded file has the wrong customer ID. The file
is a .csv file. Open the .csv file using Microsoft Excel
(or another spreadsheet program) and correct the customer number.
- GetNextDownloadFile action failed.
File not found.
Explanation: The file to be downloaded could not be found. The download
failed.
- Failed to Re-Stage file.
File 'c:\GatewayRoot\Unknown\dec1804' not found.
Explanation: The user tried to re-stage
the file, and the re-stage failed.
Other examples of messages that you might see are the following:
- Invalid Format File 'C:\GatewayRoot\InBox\Import810Z.xml'
has been moved to UnknownFiles directory.
Explanation: An .xml file type was in an inbox for upload to the system.
The Gateway does not support .xml files.
The gateway has put the file in the Unknown files directory -- a "holding
place" defined in the gateway configuration.
- Inbox Folder 'c:\Houlihan' does not exist
Explanation: The gateway cannot upload a file from the inbox Houlihan
because either the inbox has not been
set up,
or the gateway cannot find it.
FtpPutFile Extd Err: 0 200 Representation type is ASCII nonprint.
200 PORT subcommand request successful.
501 Specified object name too long, limit is 10 characters: \CHS\export\.
Explanation: The file is being transferred to another network via
an FTP server. The name of the file is too long. (See the Use
Short File Names field on the FTP server setup panel.)
To view gateway file
status and restage files:
Files can fail to download for different reasons -- available disk space might
be insufficient for the file size; a server might be disabled; and others. When
a file fails to download, the file appears on the Reset Gateway File Status
list. You can view the reasons for the failure, and restage a file for download
from this list (after you fix whatever problem caused the failure).
- From Work in Administration, select Client Gateway > Gateway File
Status. The list of failed download files appears (Figure 12).
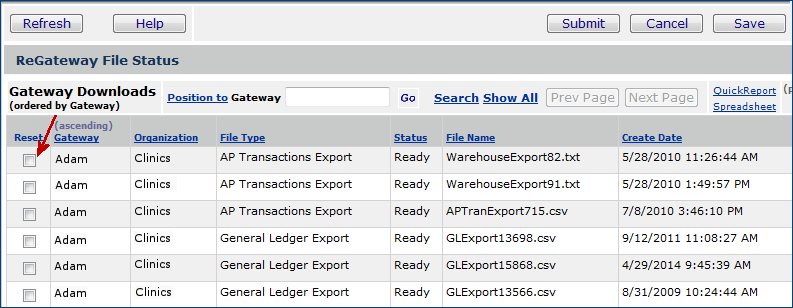
Figure 12 - Reset Gateway File Status Panel
- To restage a file for download, select Reset in the row
that contains the file path.
- Click Submit.
The file is ready for a new download attempt by the gateway.
Gateway Commands
You can define commands to be executed on files
that are downloaded to your network.
To create/edit gateway commands:
- From Work in Administration, select Client Gateway > Gateway Commands.
A list of commands for execution on downloaded files appears (Figure 13).
If you have not entered any commands, No Data appears.
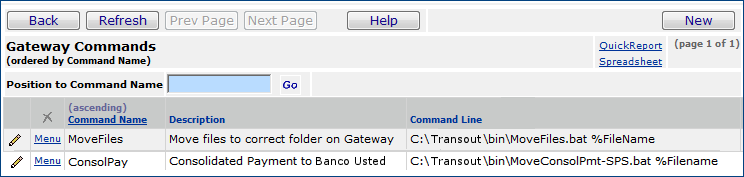
Figure 13 - Gateway Commands List
- Click New to enter a new command. The Gateway Command edit panel appears.
- If you wish to edit an existing command, click
the edit icon or select Menu > Edit next to the command name.
- Complete information in the Gateway Command edit panel to specify the command.
- Click Submit. You are returned to
the Gateway Commands list.
- Click Refresh to view your command.
Copyright © 2023 by Premier Inc. All rights reserved.